For the Photography course i am currently attending, the first project we were given entitled 'Movement of People' was quite a challenge. I was a little unsure of what I wanted to do. Like the brief stated, the term ‘movement of people’ is open to many interpretations. I did some research of what this could be and through this i found inspiration for my final shots. I hope you like them...
Portrait Movement is the first part of the project, check back for the next!
Portrait Movement
Title: ‘Love’
Kit Used:
Olympus E-400 with 14-42mm Lens
Manfrotto Tripod
Reading Lamp (light source)
One helpful Wife (Model)
Technical Data:
Exposure: Manual
Shutter Speed: 1.0 sec
Aperture: f/5.6
ISO: 100
Focal Length: 24mm
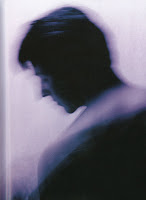
 I wanted to create a similar look to an image that inspired me for this shoot ‘Fragile Movement’ (below) by Rudi Muhlbauer from the book ‘Photographing People; Portraits, Fashion, Glamour (New Edition) from RotoVision’.
To create the shot I asked my wife if she would be my model for the evening and if she wouldn’t mind a bit of gentle swaying! I started by positioning a Tripod a few feet away from my living room wall, at head height and also a reading lamp to the right of the camera. I then asked my wife to pose similarly to the model from Rudi’s shot and to gently sway back and forth.
I shot using various shutter speeds and focal lengths and I asked my wife to try slightly different poses, change her position within the frame and to keep the movement gentle. The results were starting to look promising so we decided on a change of clothes; draping a shoal across her shoulders gave some needed interest into the shot, I finally adjusted the lights position and took some more shots until I was happy with the subtle movement effect that was captured.
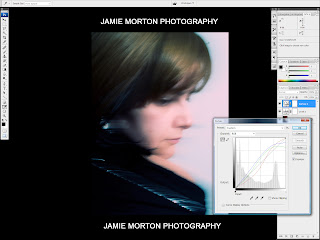
In Photoshop I post processed the image to create a stylised ‘fashion’ or ‘glamour look’ taking further inspiration, but not copying the original. The Photoshop process can be viewed below.
Photoshop Process
Photoshop Process
01 Levels: The first stage of the digital darkroom process was to save out the original RAW file as a TIFF file. I then created a Levels adjustment layer by clicking the half black and white circle icon at the bottom of the layers pane. Alternatively this can be found in Layer>New Adjustment Layer>Levels or here (if you don’t want to create a layer) Image>Adjustments> Levels.
I made a small tweak to the white point to lighten the exposure and clicked OK.
02 Curves Cross Processed: Next was to create a Curves adjustment layer, again selecting the black/white icon. I tried a few different curves before settling on the Cross Process option found in the drop down menu, this gave me a good starting point and I then made further adjustments to each of the RGB channels until I was happy with the results.
03 HighPass Filter: I then made a duplicate copy of the background layer (main image) and placed a High pass filter on it; Filter>Other>High Pass, selected a radius of 20 pixels and selected ‘Soft Light’ from the blend drop down menu (next to the Opacity slider). This helped to sharpen and bring back detail into image.
04 Clone: I made another duplicate of the background layer and selecting the Clone tool, I cloned out the distracting dark mass protruding from the hair fringe.
05 Saturation: To add a little punch of colour into the image, I then created a Hue/Saturation adjustment layer and made a small tweak to the saturation slider, using a value of +10, which added a little more colour into the skin tones.
I was pleased with the results I had achieved for the colour version and moved onto create the Black and White version.
06 ChannelMixer-B&W: From trying a few different processes and adjustments throughout the Photoshop session, I had converted the image to black and white, which I liked the look of. So finally having saved out a colour version I used the Channel Mixer and selected the ‘Monotone’ checkbox and adjusted the sliders (being careful not to go over a total of 100%) until I was happy with the look.


No comments:
Post a Comment