Thursday, 18 February 2010

Photography Course, 'Movement of People' project Part 3

Welcome to the third and final part of the 'Movement of People' project.


Title: ‘Underground Ghosts’

Kit Used:
Olympus E-400 with 14-42mm Lens

Technical Data:
Exposure:                 Manual
Shutter Speed:         1/6 sec
Aperture:                 f/5.6
ISO:                        400
Focal Length:          14mm

I visited London for a long weekend with the idea of capturing ‘moving’ people in the busy London Underground. The Underground for me is an amazing place; it has a great feeling of the old meeting the new, with Victorian tile clad walls, piped ceilings and modern advertising boards and literally thousands of people of all walks of life moving through it constantly, everyday.
It can get very busy, but this was to my advantage, as I didn’t have to wait around to capture shots of people moving and waiting for the screeching tube.

To shoot the people in the Underground I played with a few shutter speeds and ISO numbers until I found something that worked fairly consistently. I then shot almost all of the images not looking through the viewfinder, but with the camera casually hanging from the neck strap. This could be seen as a ‘hit and miss’ approach, but having taken some test shots and with plenty of memory on my compact flash card, I still had to consider good composition and capture the moment as it happened. I tried this method as I wanted to keep a low profile and to not draw attention, which I would have certainly got if I was holding the camera up to my eye.

In Photoshop I post processed the image and created three different looks from the one shot; colour, black and white and a colour ‘pop’ version. I thought each variation worked well and goes someway to show what you can get out of a single photo!


Photoshop Process

01 Original: I started the process by first converting the image to an 8bit tiff Image>Mode> 8 bits/channel. This allows the TIFF file to be saved out to any of the image formats available in Photoshop, where a 16bit TIFF only has a few formats to choose from.


02 Levels: Next was to create a Levels adjustment layer where only a small change was required.
  

03 Curves: I then created a Curves adjustment layer and used a cross processed (custom) curve to punch more colour into the image. I liked the affect this had on the colours in the iamge helping to pick out the blues in the roof and the red, yellow and green colours of the commuters clothing.


04 Gaussian Blur: Next I applied a Gaussian Blur filter to help reduce some of the noise or grain in the image. To do this I made a duplicate of the background and named this layer ‘Gaussian Blur’. I then applied the Gaussian Blur Filter, found in Filter>Blur> Gaussian Blur and entered a value of 0.7 in the radius field.


I was happy with the processes made to the image so far and so I saved out a high quality JPEG of this version (colour).

05 Black&White: I wanted to create a black and white version of the shot, as I thought this effect would work well. I tried the Black & White adjustment layer instead of the Channel Mixer to convert the image, which is a useful alternative. Like the Channel Mixer you move sliders to adjust the colour tones of the image.


06 Black&White-SelectColour: I also applied a ‘Tint’ to the image by selecting the Tint checkbox and then selecting the colour swatch. From the target colour window I chose a Grey/Blue colour, which I liked the look of, as it matched the industrial feel of the underground.


I was happy with these changes and the look of the Black and White image. I saved out a high quality JPEG of this version (B&W).

07 ColourPop: Finally, I wanted to see how some colour ‘popping’ would work within the image and so I duplicated the Black & White layer and deleted the layer mask, by right clicking the white layer box. Hiding the original Black & White adjustment layer, I then created a layer mask from Layer>Layer Mask> and selected 'Reveal All'. The colour swatches in the Tools panel change to black/white when this is applied. Selecting the black colour swatch will reveal the image (pixels) and the white colour swatch will hide them.
I selected the Brush from the tool panel and set the opacity to 40%, to only reveal some of the pixels and painted over the area I wanted to 'pop' out. This gave the yellow of the ladies jacket the muted tone I was after.


I was happy with the colour pop effect and I saved out a high quality JPEG of this version (colour pop). I now had three versions from the one shot, which i could use towards the photography course and apply the techniques i learned and used for future projects.
 
Thank you for reading!

Monday, 15 February 2010

Photography Course, 'Movement of People' project Part 2

Welcome to part 2 of my 'Movement of People' project...here goes...

Title: ‘Matrix Agent’

Kit Used:
Olympus E-400 with 70-150mm Lens

Technical Data:
Exposure:                 Manual
Shutter Speed:          1/60 sec
Aperture:                  f/5.6
ISO:                         400
Focal Length:           150mm


Whilst on a weekend trip to London I walked down the Thames bank towards the Tower of London and witnessed a whole host of street performers and acts. A man in a suit caught mine and lots of tourist’s attention by performing something that bit different, by picking people out from the crowd and positioning them into various poses, he would then place himself within the scene and they would both freeze in action! He reminded me of an agent from the movie The Matrix and particularly with this act he performed, positioning a lady into a fight stance and then standing in front looking as if he is being punched. I thought the whole act was a great juxtaposition of the brief ‘Movement of People’, as the shot captured and froze moving people…frozen!

I had fortunately attached my 70-150mm lens so I was able to zoom in and capture the frozen action up close to show the face of fake ‘pain’ of the agent and leaving the assailant a mystery.


I post processed the image in Photoshop, creating a Black and White image for the final piece.


Photoshop Process
 
01 Levels: From the original unaltered shot I started the digital darkroom processing, by first creating a levels adjustment layer. The image at this stage needed a tweak to the white point, so I moved it towards the first main peak of the histogram until I was satisfied with the increase in exposure and clicked ‘ok’.
 

02 Curves: Next I created a curves layer and placed a simple ‘S’ curve to add contrast into the image.

 
03 Gaussian Blur: The image had a little noise or grain from using a higher ISO. I knew I wanted the final image to be Black and White and I think some grain can add to the overall look of a black and white shot, but I wanted to tone it down a little by adding a Gaussian blur.
I duplicated the background layer and named it ‘Gaussian Blur’ for convenience. I then applied the blur effect found in Filter>Blur> Gaussian Blur.


04 Hue-Saturation: I then created a Hue-Saturation layer and added a small amount of saturation to add some colour into the skin tones.


05 ChannelMixer: With the colour image version improved, I then created a Channel Mixer adjustment layer and converted the image to black and white by selecting the ‘Monochrome’ check box. I then adjusted the RGB sliders, keeping the total at +100% until I was happy with the look.


06 HighPass Filter-Marquee: I wanted to add a little sharpness into the subject of the image ‘The Agent’, so I started by duplicating the background layer and naming it ‘HighPass Filter’. I then drew a rough marquee selection around the body of the agent and then applied a sharpening filter found in Filter> Other> High Pass, selected a radius of 10 pixels and hit ‘ok’. I then finally selected ‘Soft Light’ from the blend drop down menu (next to the Opacity slider).


Friday, 12 February 2010

Photography Course, 'Movement of People' project Part 1

For the Photography course i am currently attending, the first project we were given entitled 'Movement of People' was quite a challenge. I was a little unsure of what I wanted to do. Like the brief stated, the term ‘movement of people’ is open to many interpretations. I did some research of what this could be and through this i found inspiration for my final shots. I hope you like them... 

Portrait Movement is the first part of the project, check back for the next!

Portrait Movement


Title: ‘Love’

Kit Used:
Olympus E-400 with 14-42mm Lens
Manfrotto Tripod
Reading Lamp (light source)
One helpful Wife (Model)

Technical Data:
Exposure:               Manual
Shutter Speed:       1.0 sec
Aperture:               f/5.6
ISO:                     100
Focal Length:        24mm

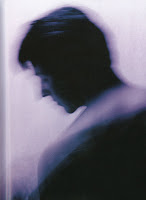
I wanted to create a similar look to an image that inspired me for this shoot ‘Fragile Movement’ (below) by Rudi Muhlbauer from the book ‘Photographing People; Portraits, Fashion, Glamour (New Edition) from RotoVision’.

To create the shot I asked my wife if she would be my model for the evening and if she wouldn’t mind a bit of gentle swaying! I started by positioning a Tripod a few feet away from my living room wall, at head height and also a reading lamp to the right of the camera. I then asked my wife to pose similarly to the model from Rudi’s shot and to gently sway back and forth.

I shot using various shutter speeds and focal lengths and I asked my wife to try slightly different poses, change her position within the frame and to keep the movement gentle. The results were starting to look promising so we decided on a change of clothes; draping a shoal across her shoulders gave some needed interest into the shot, I finally adjusted the lights position and took some more shots until I was happy with the subtle movement effect that was captured.


In Photoshop I post processed the image to create a stylised ‘fashion’ or ‘glamour look’ taking further inspiration, but not copying the original. The Photoshop process can be viewed below.

Photoshop Process

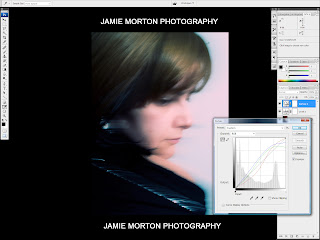
01 Levels: The first stage of the digital darkroom process was to save out the original RAW file as a TIFF file. I then created a Levels adjustment layer by clicking the half black and white circle icon at the bottom of the layers pane. Alternatively this can be found in Layer>New Adjustment Layer>Levels or here (if you don’t want to create a layer) Image>Adjustments> Levels.


I made a small tweak to the white point to lighten the exposure and clicked OK.

02 Curves Cross Processed: Next was to create a Curves adjustment layer, again selecting the black/white icon. I tried a few different curves before settling on the Cross Process option found in the drop down menu, this gave me a good starting point and I then made further adjustments to each of the RGB channels until I was happy with the results.


03 HighPass Filter: I then made a duplicate copy of the background layer (main image) and placed a High pass filter on it; Filter>Other>High Pass, selected a radius of 20 pixels and selected ‘Soft Light’ from the blend drop down menu (next to the Opacity slider). This helped to sharpen and bring back detail into image.


04 Clone: I made another duplicate of the background layer and selecting the Clone tool, I cloned out the distracting dark mass protruding from the hair fringe.


05 Saturation: To add a little punch of colour into the image, I then created a Hue/Saturation adjustment layer and made a small tweak to the saturation slider, using a value of +10, which added a little more colour into the skin tones.


I was pleased with the results I had achieved for the colour version and moved onto create the Black and White version.

06 ChannelMixer-B&W: From trying a few different processes and adjustments throughout the Photoshop session, I had converted the image to black and white, which I liked the look of. So finally having saved out a colour version I used the Channel Mixer and selected the ‘Monotone’ checkbox and adjusted the sliders (being careful not to go over a total of 100%) until I was happy with the look.